Spreadsheets
In models of the Spreadsheet type you can carry out evaluations and calculations. In addition, you can use this model type if you wish to specify large amounts of attributes.
You can use models and objects that already exist in ARIS as occurrences in models of the Spreadsheet type.
You can create models of the Spreadsheet type and make calculations in a spreadsheet.
Prerequisite
The model type that your model is based on is allowed by the method filter used. You select the method filter when you log in to the database.
Click
 Application launcher >
  Models and objects.
Click Create model.
Click the group in which you want to create the spreadsheet or create a new group.
Select
 Spreadsheet.
Enter the relevant name.
Click OK.
The spreadsheet is created in the selected group and opened for editing on a new tab.
You can write contents directly in the cells of your spreadsheet.
Open a spreadsheet.
Click Contents.
Click the cell for which you want to add the content.
Click
 Insert object. The dialog opens.
Select the relevant content.
Click OK.
You have added contents to your spreadsheet.
You can calculate numerical values directly in your spreadsheet.
Open a spreadsheet.
Click Contents.
Select an empty cell.
Select
 Insert formula. Or enter the relevant formula, for example, =SUM(C10;C13).
Press Enter.
The result of the calculation is displayed in the cell.
You can also calculate with attribute values of ARIS objects in this way.
Calculate the sum of three cells containing the values 10, 14, 10, and 30.
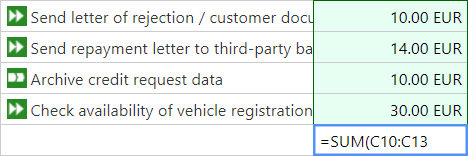
You can add attributes to a spreadsheet.
Open a spreadsheet.
Click Contents.
Click the relevant cell in the spreadsheet. The cell contents of a selected cell is overwritten without confirmation prompt.
Click
 Insert attributes. The Select attributes dialog opens.
Click the relevant attribute.
Click OK.
You have added the attribute to the spreadsheet.
You can specify the row height of your spreadsheet.
Open a spreadsheet.
In the row header, drag the mouse pointer to the border of a cell. The mouse pointer shows the directions in which you can drag the bar border:

Keep the mouse button pressed, drag the mouse pointer until the desired height is reached and release the mouse button.
To adapt the row height exactly to the content height, double-click the cell border.
You have specified the row height of a row.
You can specify the column width of your spreadsheet.
Open a spreadsheet.
In the column header, drag the mouse pointer to the border of a cell. The mouse pointer shows the directions in which you can drag the bar border:

Keep the mouse button pressed, drag the mouse pointer until the desired width is reached and release the mouse button.
To adapt the column width exactly to the content width, double-click the cell border.
You have specified the column width of a column.
You can add a row or a column to your spreadsheet.
Open a spreadsheet.
Click the a cell of a row or column.
Click
 Insert cells > Insert row above or Insert cells >
  Insert row below to insert a row above or below the selected row. Click Insert cells > Insert column (left) or Insert cells >
  Insert column (right) to insert a column left or right to the selected column.
The new row or column is inserted.
You can add objects to a cell.
Open a spreadsheet.
Click Contents.
Click
Insert object. The dialog opens.Select the object that you want to add to the spreadsheet.select You can type the beginning of the object name to find the object.
Click OK.
An occurrence of the object is now available in your spreadsheet.
You can cut an object from a cell.
Open a spreadsheet.
Select a cell that contains the object you want to cut.
Click
 Cut.
Cut.
The object is added to the clipboard.
You can insert the object in any empty cell by selecting the cell and clicking  Paste. Then, the object is cut out and pasted to the selected cell.
You can copy an object in a cell.
Open a spreadsheet.
Select a cell that contains the object you want to copy.
Click
 Copy.
Copy.
The object is copied to the clipboard.
You can insert the object in any empty cell by selecting the cell and clicking Paste.
You can add objects to a cell.
Open a spreadsheet.
Make you changes.
Click
 Save.
Save.
The spreadsheet is saved.
You can show or hide the header of a spreadsheet.
Open a spreadsheet.
Click Contents.
Click Header.
If the header was displayed, it is now hidden and vice versa.
You can merge cells.
Open a spreadsheet.
Select the cells you want to merge.
Click Merge. If the selected area contains any content, the content is deleted and a dialog to confirm the merging opens. Only content of the top left cell of selected area will preserve after the merge.
The selected area of the spreadsheet is merged.
To unmerge, select the merged area and click Unmerge.
You can hide columns or rows temporarily.
Open a spreadsheet.
Activate the Start tab bar.
Select the columns or rows you want to hide. Select multiple rows or columns by holding down the Shift key and clicking the first and last row or column. You can select rows or columns that are not adjacent by holding down the Ctrl key.
Click
 Visibility > Hide column(s) or Visibility > Hide row(s).
The columns or rows are no longer displayed.
To display the rows or columns again, click Visibility > Show column(s) or Visibility > Show row(s).
You can clear the content of cells. The cell format and conditional formatting of the cells are retained.
Open a spreadsheet.
Select a cell.
Click
 Delete cells.
Select
Delete cells to delete the selected cell.Select Clear formatting to remove the formatting but preserve the content of the cell.
Select Clear formatting and content to remove both the formatting and the content of the cell.
Select
 Delete rows to delete the complete rows of the selection.
Select
 Delete columns to delete the complete columns of the selection.
You have deleted the contents of the selected cells. The objects or attributes are still available in the database.
You can delete rows or columns from a spreadsheet.
Warning
Deleting rows deletes all the contents of those rows.
Open a spreadsheet.
Select the rows or columns you want to delete.
Click Delete cells > Delete row(s). to delete rows. Click Delete cells > Delete column(s). to delete rows.
The selected row(s) or column(s) including their content are deleted without further confirmation.
You can protect areas of a spreadsheet to prevent people from changing, moving, or deleting important data.
Open a spreadsheet.
Click Contents.
Select the area of the spreadsheet you want to protect.
You can select an entire row or column by clicking the row or column header. You can select rows or columns that are adjacent by holding down the Shift key.
Click
 Protect.
The area of the spreadsheet is now protected from editing. To be able to edit this area again, select the area and click  Unprotect.